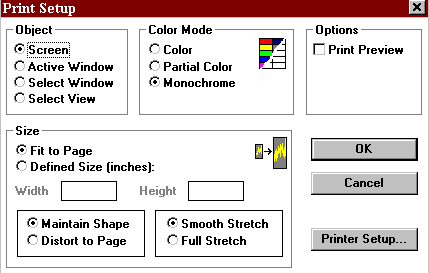
16 PRINTING                                                                           Main Table of Contents

Windows® Print Setup

Print Setup Parameters

Screen Prints

Active Window Prints

Select Window Prints

Select View Prints


WindowsÒ Print Setup                                             

Aspen Graphics takes full advantage of the print functions available in Microsoft Windows®. This section will step you through the setup procedure necessary to print within Aspen. To setup the print function, follow these steps:

  1. Within Aspen Graphics, single left click on File in the menu bar. The File drop down menu will appear.
  2. Single left click on Print Setup. The Print Setup window will appear (see Figure 1).
  3. Figure 1

  4. Single left click on Printer Setup. Another Print Setup window will appear (see Figure 2).
  5. Figure 2

    4. Select the type of printer you will be using, the paper size and source, and the orientation of the printing.
    5. When selections have been made, single left click on OK. The original print setup menu will appear.
    6. Make your selections in the Object, Color Mode, Options, and Size fields.
    7. When selections have been made, single left click on OK. The Printer Setup menu will disappear, and the system will be setup to print.


Print Setup Parameters                                 Top of Page

The following tables will explain what each selection in the two Aspen Graphics for Windows Print Setup menus will do. Table 1 is the main Print Setup menu (see Figure 1). Table 2 is the secondary setup menu (see Figure 2).


Section Selection Function
Object Screen Prints the entire screen.
  Active Window Prints only the window that is active (blue border) at the time.
  Select Window Allows you to choose which window you want to print.
  Select View Allows you to define the area that you want to print.
Color Mode Color Prints in full color, including the background.
  Partial Color Prints in partial color. The background will be white.
  Monochrome Prints in black on white.
Options Print Preview Lets you preview the print job before you print it.
Size Fit to Page Automatically sizes the print job to fit the page.
  Defined Size (inches) Allows you to define the size of the page.
  Width When Define Size has been selected, you select the width of the print job.
  Height When Define Size has been selected, you select the height of the print job.
  Maintain Shape Makes the page maintain its shape as width and height are defined.
  Distort to Page Allows the shape of the page to change as width and height are defined.
  Smooth Stretch Keeps the page intact as you make it larger.
  Full Stretch Stretches the print job to fill the page.


Section Function
OK Accepts the changes you have made.
Cancel Closes the main Print Setup menu without making changes.
Printer Setup Enters the secondary Printer Setup menu.

Table 1

Section Selection Function
Printer Name Allows you to select the type of printer you will be using.
  Properties Allows you to customize the print quality, size, orientation, paper and media sources.
Paper    
  Size Allows you to customize the type of paper you are using.
  Source Allows you to choose between auto and manual feed.
Orientation   Allows you to choose between portrait and landscape.
OK   Accepts the changes you have made.
Cancel   Closes the secondary Print Setup menu without making changes.

Table 2

Screen Prints                                 Top of Page

To print the entire screen, follow these steps:

  1. Single left click on File in the menu bar.
  2. Single left click on Print Setup. The Print setup menu will appear.
  3. Single left click on Screen in the Object section.
  4. Single left click on OK. The Print setup menu will disappear.
  5. Single left click on File in the menu bar.
  6. Single left click on Print. If you have chosen to see a Print Preview, it will be displayed at this time. If you have chosen NOT to see a print preview, the page will be queued to the printer.
  7. If the print preview looks acceptable, single left click on OK, and the page will be queued to the printer.


Active Window Prints                                 Top of Page

    To print the active window, follow the same steps for Screen Prints, but select Active Window in step 3.

Select Window Prints

    To print a select window, follow the same steps for Screen Prints; however, choose Select Window in step 3.

    When Select Window is chosen, the mouse pointer will turn into a hand icon. Using the mouse, place the hand inside of the window you would like to print, and single click the left mouse button.

Select View Prints                                 Top of Page

To select the area you want to print, follow these steps:

  1. Single left click on File in the menu bar.
  2. Single left click on Print Setup. The Printer Setup menu will appear.
  3. Single left click on Select View in the Object section.
  4. Single left click on OK. The Printer Setup menu will disappear.
  5. Single left click on File in the menu bar.
  6. Single left click on Print. The mouse cursor will change to a cross.
  7. Move the mouse cross to the top left edge of the area you wish to print.
  8. Single click and HOLD the left mouse button.
  9. Drag the mouse cross hair to the lower right edge of the area you wish to print.
  10. Release the left mouse button. The area you have selected will now print.