5 QUOTES
Main Table of Contents
Understanding Quotes in Aspen Graphics
Top of Page
Quotes in Aspen are usually displayed in white. When they appear in another color, it
is a signal that something is special about that quote. Table 1 is a list of what these
other colors are signaling. Table 2 is a list of additional information symbols use along
with pricing quotes.
| When the
quote is… |
…
indicates that this quote is… |
| Yellow |
New Tick |
| A Red Last price |
A New Daily Low |
| A Green Last price |
A New Daily High |
| A Red Net Change |
Down from yesterday’s close |
| A Green Net Change |
Up from yesterday’s close |
| Highlighted (displayed on a black background) |
New or just recalculated |
Table 1
Last prices are followed by symbols that provide additional information
about the price:
Symbol |
Example |
Definition |
a |
986a |
ask |
b |
986b |
bid |
s |
986s |
settle |
|
986 |
up tick |
¯
|
986¯ |
down tick |
Table 2
Using Quote Windows and Pages
Top of Page
The next sections explain how to use the Quote Windows and Pages
in three different ways:
- Using Existing Quote Windows and Pages
- Building your own Quote Window
- Modifying an Existing Quote Page
Using
Existing Quote Windows and Pages
Top of Page
Quote windows can be found in the Window Selection Menu (see Figure 1). To bring up the
Window Selection Menu, type .win  .
.
The Quote windows in your system will be listed under the QUOTES heading of this
menu.
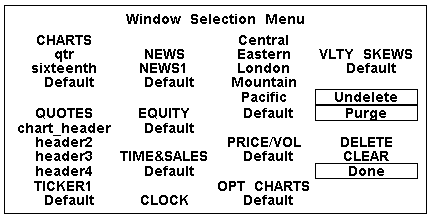
Figure 1
Quote pages can be found in the List of Pages. To bring up
the List of Pages type .pages .
The quote pages that came with your system include SUPERQUOTE, and those pages are
prefaced with a Q_ or qt_ in this menu.
| REMEMBER: DO NOT delete these or any other pages or
windows that came with your system! |
Changing
Symbols
Top of Page
Some quote windows and pages are designed to give you a lot of information on one
symbol. The SUPERQUOTE page is an example of a quote page in which all the data is making
reference to the same instrument. To change a symbol on this type of page, simply type the
name of the symbol you want to display. You will see the letters appear in the upper-left
corner of the active window.
Other quote pages display information on many different instruments. On these pages, it
is best to type .edit ,
or single click with the left
mouse button under the SYMBOL column, and type the name of the instrument in the
small black edit box which will appear (see Figure 2). Then tap the key one time. Typing a new
symbol will replace the old symbol, if any, that is in the edit box.
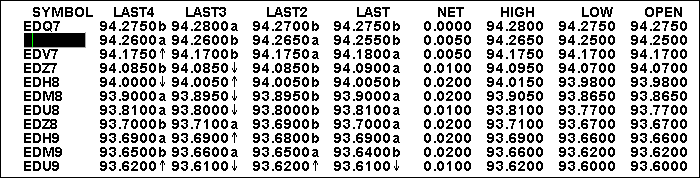
Figure 2
Building a Custom Quote Window
Top of Page
To build a custom quote window, follow these steps:
- Type .dq to
display a default quote window.
- Tap the
 key one time.
Single left click on Modify Layout from the Quote Menu. Two things
will happen:
key one time.
Single left click on Modify Layout from the Quote Menu. Two things
will happen:
- The background of the default quote window will change to a grid.
- The Quote Menu will change to an Edit Quotes menu (see Figure 3).
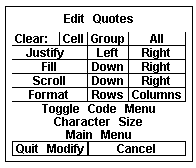
Figure 3
| If you’d like your quote window to look like this: |
|
If you’d like your quote window to look like this: |
 |
|
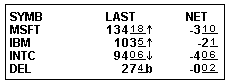 |
Figure 4a |
|
Figure 4b |
| select Rows on the Format
line of the Edit Quotes menu. |
|
select Columns on the Format line of the Edit
Quotes menu. |
In the following example, we will build a quote window that looks
like the window in Figure 4b.
- Single click with the left mouse button on the word Columns on the Format
line of the Edit Quotes menu.
- Next, single left click on Toggle Code Menu from the Edit Quotes menu. You
will notice that one cell in the grid is colored. This marks the place where your
selections will first be inserted into the quote window.
- If you need to move the colored cell, single click on the new cell with the left mouse
button.
- Once this cell is in the correct place, begin making your selections from the Toggle
Code Menu.
- Place the mouse pointer on SYMB, and single click the left mouse button.
You will observe that SYMB is printed in yellow, which indicates that it is a label.
The $1.symb below it is the quote code to display the symbol.
| For a definition of each selection in the Toggle Code Menu, please see
Appendix B of this manual. |
- If your quote window looks like Figure 5, type .wsave . Type qt_window at the Save
Window As: prompt. Tap the key one time. Proceed to step 7. If your quote window does
not look like Figure 5, type .clear , and begin again from step 1.

Figure 5
- Single click the left mouse button on LAST, then NET, HIGH
and LOW from the Toggle Code Menu.
- If your quote window looks like Figure 6, type .wsave, and then tap twice.
| When you enter the name qt_window, you will be prompted with the message:
Overwrite Existing Window, "qt_window?" Double-left click on Proceed. |
- Proceed to step 10. If your window doesn’t look like Figure 6, type .clear . Type qt_window , and begin again at step 7.
| You may need to move the Edit Quotes menu out of the way as you work. To move
the menu, place the mouse pointer in the middle of the Edit Quotes Menu, single click and
HOLD the right mouse button, and drag the menu where you want it to be. Release the right
mouse button |
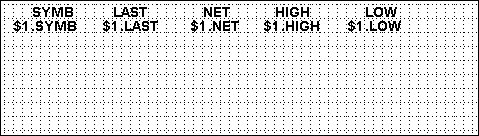
Figure 6
The next step in creating the window is to single click the left mouse button on the
word Down on the Fill line of the Edit Quotes menu. Your quote
codes will be filled down, and your quote window should now look like Figure 7.
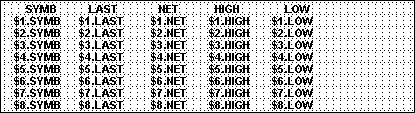
Figure 7
To finish the quote window, tap the  two times to remove the Toggle Code Menu.
Tap the key one time to bring up the Edit Quotes Menu.
Single click the left mouse button on Quit Modify on the Edit Quotes menu.
Type .edit . A
small edit box will open.
Type in the first symbol you want to display, and tap the key one time.
Continue adding symbols you want to display. Your quote window should look like Figure
8.
two times to remove the Toggle Code Menu.
Tap the key one time to bring up the Edit Quotes Menu.
Single click the left mouse button on Quit Modify on the Edit Quotes menu.
Type .edit . A
small edit box will open.
Type in the first symbol you want to display, and tap the key one time.
Continue adding symbols you want to display. Your quote window should look like Figure
8.
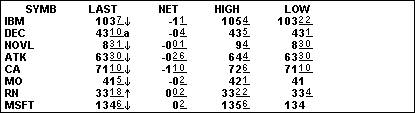
Figure 8
- Hit the
key to remove the edit box.
Be sure to save your work again using the same procedure as in step 8.
Modifying an Existing
Quote Page
Top of Page
This section describes how to make changes to an existing quote page; the same
procedure is used to modify a quote window.
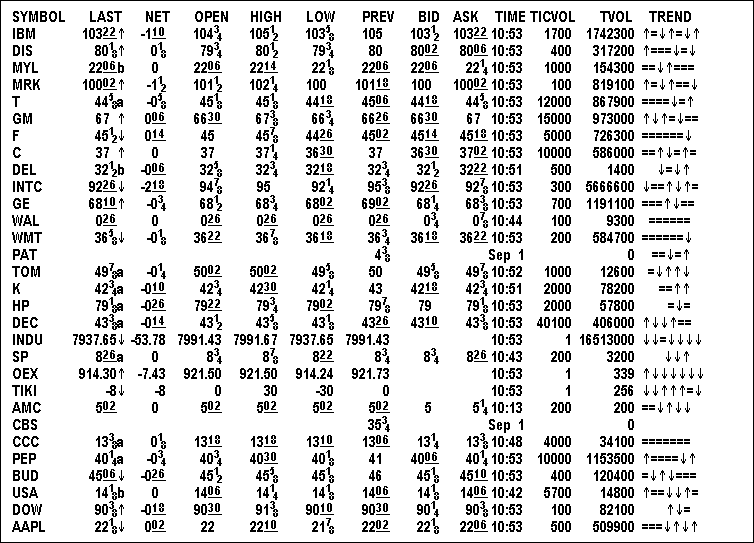
Figure 9
Suppose you want to modify the quote page qt_40v (see
Figure 9). You like the basic layout of the page, but want to make the following changes:
- You’d like to delete the TREND category.
- You’d like to move the BID and ASK categories four columns to the left.
- You’d like to insert a CLOSE category between LOW and PREV.
To make the changes, follow these steps:
- Type .clear . This
will clear the screen.
- Type qt_40v. This will bring up the qt_40v quote page (see Figure 9).
- Bring up a Quote Menu and select Modify Layout.
- To delete the TREND category, follow these steps:
- Single left click on $1.TREND (the first field beneath the yellow TREND
label). Once it is highlighted with the red border, you should see CELL=$1.TREND,7 in
the top-left-hand corner of the quote page (see Figure 10).
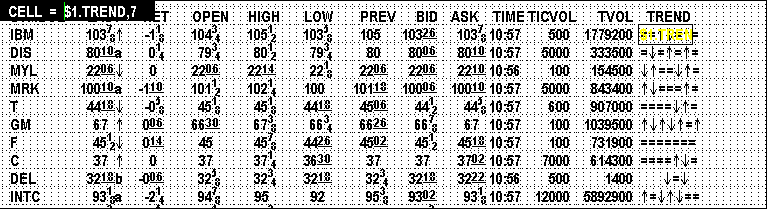
Figure 10
- Remove the $1.TREND code by single clicking left on the word Cell on the Clear
line of the Edit Quotes menu.
- Single left click on the word Down on the Fill line of the Edit
Quotes menu. The rest of the trend codes in that column will be deleted.
- Single left click on the yellow TREND label. It will become highlighted
with a red border.
Single left click on the word Cell on the Clear line of the Edit
Quotes menu. If your quote page looks like Figure 11, type .save . Type qt_page , and proceed to step 5. If it
doesn’t, type qt_40v, and begin again with step 3.
Figure 11
- To move the BID and ASK columns to the left, we must first make room for them. Follow
these steps:
- Single left click on $1.OPEN (the first field below the yellow OPEN
label) It will become highlighted with the red border.
- Single click and HOLD the right mouse button in this field, and drag it to the empty
column at the far right of the quote page.
- When the field is in the correct position, release the right mouse button.
- With the mouse pointer still in this field, single click with the left mouse button to
"drop" it in place.
- Now move the yellow OPEN label using the same "drag-and-drop"
procedure as above. If your quote page looks like Figure 12, type .save, and tap twice. Proceed to step 5f. If
it doesn’t look like Figure 12, type qt_page , and repeat step 5.
| When you enter the name qt_page, you will be prompted with the message:
Overwrite Existing Page, "qt_page?" Double left click on Proceed. |
Figure 12
- Now, using the same method as in steps 5a through 5d, move the $1.bid code
and the yellow BID label over to the column where OPEN used to be.
Don’t worry that the yellow BID label doesn’t match most of the quote codes in
that column; we’ll take care of that later. If your page looks like Figure 13, type .save,
and tap twice. Proceed to
5g. If your window doesn’t look like Figure 13, type qt_page and repeat step 5f.
| When you enter the name qt_page, you will be prompted with the message:
Overwrite Existing Page, "qt_page?" Double left click on Proceed. |
Figure 13
Move the $1.high, $1.low and $1.prev codes one column to the
right.
Do the same for the yellow HIGH, LOW and PREV labels above
the codes. Again, don’t worry that the yellow labels and the first quote code fields
don’t match the rest of the quote codes in that column. If your quote page looks like
the one in Figure 14, type .save, and tap twice. Proceed to step 5i. If it does not look like
Figure 14, type qt_page , and begin again at step 5g.
| When you enter the name qt_page, you will be prompted with the message:
Overwrite Existing Page, "qt_page?" Double left click on Proceed. |
Figure 14
- Move the $1.ask code and the yellow ASK label over next to
the BID column using the same "drag-and-drop" method we used in steps 5a
through 5d.
- Now, let’s straighten out the columns so that all the quote codes are under the
correct label. From the Edit Quotes menu, select Down on the Fill
line. If your page looks like Figure 15, save the page as in step 5h, and continue to step
9. If it doesn’t, type qt_page, and repeat steps 5i and 5j.
Figure 15
To insert a CLOSE category between LOW and PREV, follow these steps:
- Move the $1.prev code and the yellow PREV label over to the
empty column using the "drag-and-drop" method we used in steps 5a through 5d.
- Select Down on the Fill line of the Edit Quotes menu. Your quote
page should look like Figure 16.
Figure 16
- The next step is to move the colored cell to the place you want to insert the yellow CLOSE
label and the $1.close code by pointing and single clicking with the left
mouse button. See Figure 17 for an idea of where this colored cell should be located.
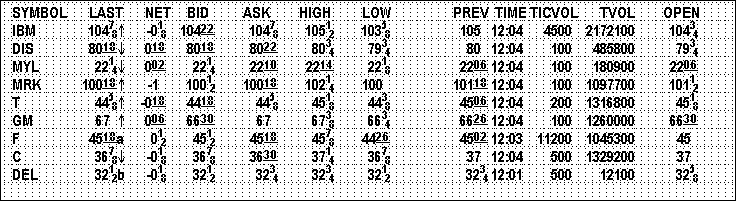
Figure 17
| If the Cell= box is open in the upper left corner of the screen, make sure and
tap the s key one time to remove this
box from the screen before proceeding. |
- From the Edit Quotes menu, single left click on Columns in the Format
line.
- Single left click on Toggle Code Menu.
- Single left click on CLOSE from the Toggle Code Menu. This will place the
yellow CLOSE label and the $1.close quote code at the top of the empty column as shown in
Figure 18.
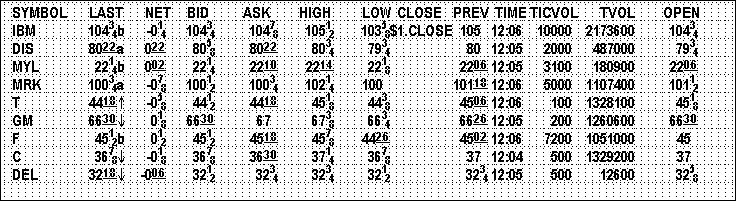
Figure 18
- You may want to move the HIGH and LOW columns over a bit to
the left to make more room for the CLOSE column; this is easily accomplished
with the "drag-and-drop" method we have been using previously.
- Once you have the columns situated and spaced to your liking, single left click on Down
on the Fill line of the Edit Quotes menu. Your quote page should look like Figure
19.
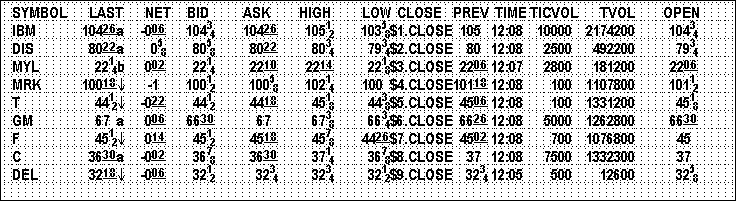
Figure 19
- Tap the
key two times to remove the Toggle Code menu from the
screen.
Tap the key one time.
This brings up the Edit Quotes menu.
Single left click on Quit Modify from the Edit Quotes menu.
Type .save and hit
twice.
Scroll Regions
Top of Page
Scroll Regions are a special type of quote window which display quotes in a scrolling
fashion (similar to a ticker) for instruments which the user defines. To build a quote
window that scrolls symbol, last, and net from left to right, follow these steps:
- From a clear screen, type .dq. This will bring up a blank default quote window.
- Type .qe. This will turn the default quote window into a grid, and display the
Edit Quotes menu.
- Single left click on the word Rows in the Format line of the Edit Quotes
menu.
- Single left click on Toggle Code Menu from the Edit Quotes menu.
- From the Code Menu single left click on SYMB, LAST, NET. Your window
should look like Figure 20.

Figure 20
Single left click on the word Right in the Scroll line from the
Edit Quotes Menu.
Resize the window so that the bottom border is just beneath the NET row. Your window
should look like Figure 21.
 Figure 21
Single left click on Quit Modify from the Edit Quotes menu.
Tap the key
one time. The Quote Menu will be displayed.
Single left click on Edit Symbols.
Type in a symbol and hit . Continue entering all of the symbols which you would
like display in the Scroll Region.
Single left click on Done.
Type .wsave .
Type a name for the window and hit .
Top of Page