7 TREND LINES
Table of Contents
This section will guide you through some of the steps necessary to draw simple
trend lines. Before continuing in this section, make sure that you are familiar with Aspen
menus and charting.
Drawing
a Trend Line
Top of Page
To enter the trendline mode, follow these steps:
- Type cht_1 to bring up a chart.
- Tap the
 key one time. The Graph Menu will appear.
- Select Trendlines. The Mouse pointer will change to a square box.
- Center the box on the starting point for the trend line you want to draw.
- Single click and HOLD the left mouse button. The pointer box will change to a pencil.
- Drag the pointer to the finish point for the trend line, and release the left mouse
button. A dotted trend line will be drawn.
- If the trend line is located correctly, single click the left mouse button. The trend
line will change to a solid line.
- If the trend line is not located correctly, tap the Delete key one time, and the trend
line will disappear.
- After the trend line has been drawn, tap the key one time, and
bring up the Trend Line Functions menu.
- Select Exit Trend Mode. The Trend Line Functions menu will disappear and
the pointer box will change to a regular mouse pointer.
Drawing a Trend Line to a
Specific Price
Top of Page
To draw a trend line to a specific price, follow these steps:
- Type cht_1 to bring up a chart.
- Tap the
key one time. This will display the Graph Menu.
Select Trendlines from the Graph Menu. The mouse pointer will change to a
square box.
Tap the  key one time. An "Enter date and price" box will appear.
Type in the date and price for the starting point of the trend line and tap the key one
time. The trend line will appear at the date and price specified.
Tap the key one time. The "Enter date and price" box will appear.
Type in the date and price for the ending point of your trend line and tap the key one
time. The trend line will now be displayed for the parameters you have entered.
After the trend line has been drawn, tap the key one time, and
bring up the Trend Line Functions menu.
Select Exit Trend Mode. The Trend Line Functions menu will disappear and
the pointer box will change to a regular mouse pointer.
key one time. An "Enter date and price" box will appear.
Type in the date and price for the starting point of the trend line and tap the key one
time. The trend line will appear at the date and price specified.
Tap the key one time. The "Enter date and price" box will appear.
Type in the date and price for the ending point of your trend line and tap the key one
time. The trend line will now be displayed for the parameters you have entered.
After the trend line has been drawn, tap the key one time, and
bring up the Trend Line Functions menu.
Select Exit Trend Mode. The Trend Line Functions menu will disappear and
the pointer box will change to a regular mouse pointer.
Deleting Trend Lines
Top of Page
To enter the trendline mode, follow these steps:
- Display the Graph Menu.
- Select Trendlines.
- Using the right mouse button, click once on the trend line you wish to delete. The trend
line should change to a dashed line.
- Tap the Delete key. The trend line will disappear.
- After you have finished deleting trend lines, tap the
key one time. The Trend Line Functions menu will appear.
Select Exit Trend Mode. The Trend Line Functions menu will disappear and
the pointer box will change to a regular mouse pointer.
The Trend Line Functions
Menu
Top of Page
In this section, you will learn about the Trend Line Functions Menu and its selections.
With a few exceptions, your menu will look similar to the one in Figure 1.
| Your system may or may not be entitled for Demark options (noted by TD). If your
system is not set up for Demark options, then certain sections in the Trend Line Functions
Menu will be unavailable to you. |
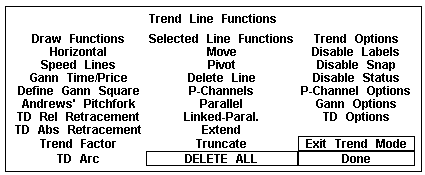
Figure 1
Draw Functions
Top of Page
This section will only address selections available with the Aspen
Graphics basic system setup.
Horizontal
Top of Page
To draw a horizontal trend line, follow these steps:
- Type cht_1 and tap the key one time. This will bring up a
chart.
- Tap the
key one time. This will bring up the Graph Menu.
From the Graph Menu, select Trendlines.
Tap the key one time. This will display the Trend Line Functions menu.
Select Horizontal. The menu will disappear and the mouse pointer will
change to a pencil.
Select the point at which you want to draw a horizontal trend line, and single click
with the left mouse button. A horizontal trend line will be drawn.
If the trend line is in the correct position, single click with the left mouse button
and it will change to a solid line.
If the trend line is in the incorrect position, tap the Delete key one time, and the
trend line will disappear. Repeat steps 4-7.
Tap the key one time. The Trend Line Functions menu will appear.
Select Exit Trend Mode. The Trend Line Functions menu will disappear, and
the pointer box will change into a regular mouse pointer.
Speed Lines
Top of Page
Speed lines help identify the rate of ascent or descent or a trend. To draw speed
lines, follow these steps:
- Display the Trend Line Functions menu.
- Select Speed Lines. The menu will disappear, and the mouse pointer will
change into a pencil.
- With the left mouse button, single click on the lowest point of an upward trend.
- With the left mouse button, single click on a high point of the upward trend. Two speed
lines will be drawn as in Figure 2.
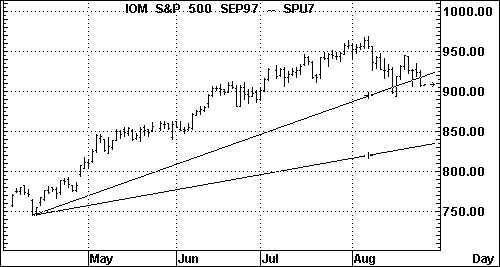
Figure 2
Theoretically, if a trend is correcting itself, it will usually
stop at the 2/3 speed line. If not, prices will seek out the 1/3 speed line. If the 1/3
line is also broken, prices may continue to seek the origin level of the trend. Trends
tend to reverse if the origin level is broken.
Gann Squares
Top of Page
A Gann square is a method of forecasting future support or resistance levels by
counting forward from the all-time low or high price of an instrument.
Because there are many books and studies written about Gann squares, we will only be
concentrating on how to initiate the Gann squares within Aspen Graphics.
To initiate Gann squares, follow these steps:
- Type cht_1
. A chart will be displayed.
Display the Graph menu by tapping the key one time.
Select Trendlines.
Tap the key one time. The Trend Line Functions menu will be displayed.
Under the heading Trend Options, select Gann Options. The menu
shown in Figure 3 will appear.
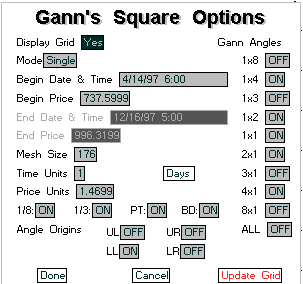
Figure 3
Change the settings in your Gann’s Square Options menu to match those shown in
Figure 3.
After changing the settings, click on Done. The Gann’s Square Options
menu will disappear.
Display the Trend Line Functions menu again.
Under the Draw Functions heading, select Define Gann Square. The
Trend Line Functions menu will disappear, and the mouse pointer will turn into a small
box.
With the left mouse button, single left click on the lowest price of the chart. The Gann
Square, as defined in the Gann’s Square Options menu, will appear. It will be similar
to the one in Figure 4.
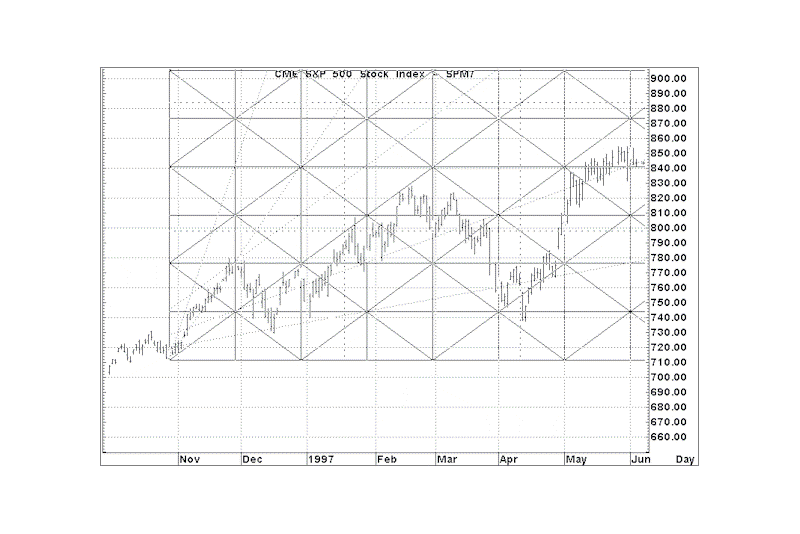
Figure 4
The Gann’s Square Options
Menu
Top of Page
This section will define the selections in the Gann’s Square Options menu. It
is important that you be familiar with Gann squares and their functions as you read
through this section. The Gann’s Square Options menu is shown in Figure 3.
| Gann
Option |
Description |
| Display Grid |
Choose either Yes or No. Selecting Yes
will display the Grid. |
| Mode |
Choose between a Multi-Grid or Single Grid. |
| Begin Date & Time |
Defines the left edge of the Gann Square. This
field is automatically filled when you click on the starting point for your square. |
| Begin Price |
Defines the beginning price for the square.
This field is automatically filled when you click on the starting point for your square. |
| End Date & Time |
Defines the right edge of the Gann Square.
This field is automatically filled when you click on the starting point for your square. |
| End Price |
Defines the end price for the square. This
field is automatically filled when you click on the starting point for your square. |
| Mesh Size |
Defines the total size of the Gann Square. In
Figure 3 the Square will be 174 bars x 1 (time units) wide by 174 x .7812 (price units)
high. |
| Time Units |
Defines the number of time units to be
multiplied by the Mesh Size to determine the width of the Gann Square. The Units can be in
days or minutes. |
| Price Units |
Defines the number of price units to be
multiplied by the Mesh Size to determine the height of the Gann Square. Units are
displayed in decimal format. |
| 1/8 |
Displays an 8 by 8 grid within the Gann Square |
| Gann
Option |
Description |
| 1/3 |
Displays a 3 by 3 grid within the Gann Square. |
| Pt |
Displays the one point grid. |
| BD |
Displays the border. |
| Angle Origins |
Defines the origins of the Gann Angles |
| UL |
Starts the Gann Angles from the upper left
corner |
| UR |
Starts the Gann Angles from the upper right
corner. |
| LL |
Starts the Gann Angles from the lower left
corner. |
| LR |
Starts the Gann Angles from the lower right
corner. |
| Gann Angles |
Allows you to customize the angles in the Gann
Square. The ALL selection, allows you to enable or disable all of the selections at the
same time. |
Table 1
Andrews’ Pitchfork
Top of Page
Andrews’ Pitchfork (Figure 5) was developed by Dr. Alan Andrews and employs
three points. First, a line is drawn between a significant high (point A) and a
significant low (point B). This line is bisected, and the median of this line forms a base
point for the second line, known as the median line. You then identify the second base
point (point C) for the median line. To draw a pitchfork, follow these steps:
- Bring up a chart with the instrument you want to use.
- Enter the trend line mode.
- Display the Trend Line Functions menu.
- Select Andrews’ Pitchfork. The menu will disappear, and the mouse
pointer will change into a pencil.
- Single left click and release on a high point that is near the middle of the chart. A
red 1 will appear, and a dotted line will follow your mouse pointer.
- Single left click and release on the next significant low point. A long dotted line with
a red 2 will appear.
- Single left click on a significant low point that precedes the point you chose in step
5. Andrews’ pitchfork will be completed and should resemble the pitchfork in Figure
5.
- Display the Trend Line Functions menu, and single click on Exit Trend Mode.
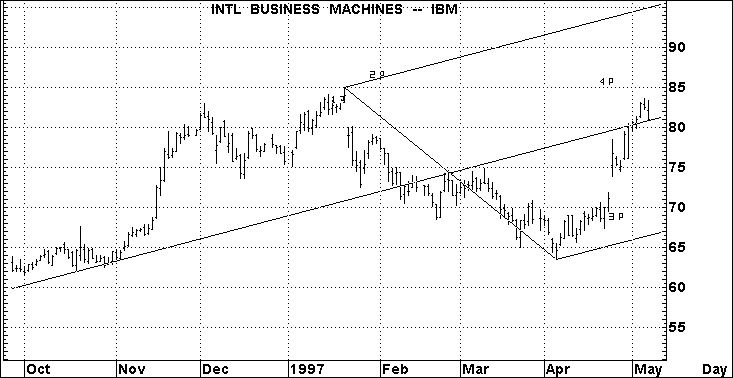
Figure 5
Selected Line
Functions
Top of Page
The Selected Line Functions column is used to refine trend lines that have already been
identified. Prior to drawing a trend line, the Selected Line Functions column will be
blacked out and unavailable for use. Once a trend line is drawn, the column is activated
and is ready for use.
In this section, you will get a chance to experiment with each function. To use the
selected line functions, follow these steps:
Move
Top of Page
- Bring up a chart with an instrument you want to use.
- Enter the trend line mode.
- From the Trend Line Functions menu, select Horizontal. The menu will
disappear, and the mouse pointer will change to a pencil.
- Single left click on a price point in the middle of the chart. A horizontal dashed line
will appear.
- Bring up the Trend Line Functions menu.
- With the left mouse key, click and HOLD on the word Move in the
Selected Line Functions column.
- Move the trend line to a new location, and release the left mouse
button.
| While a trend line is highlighted (dashed line), click and HOLD with the right
mouse button to move it. This is a faster way to move a trend line. |
Pivot
Display the Trend Line Functions menu.
With the left mouse button, click and HOLD on the word Pivot in the Selected
Line Functions column.
Move the pointer. As you move it, the line pivots. When it is in the location you want
to pivot it, release the left mouse button.
| While a trend line is highlighted (dashed line), double click and HOLD with
the right mouse button to pivot it. This is a faster way to pivot a trend line. |
Delete Line
Top of Page
Display the Trend Line Functions menu.
With the left mouse button, click once on Delete. This will delete the
highlighted (dashed line) trend line.
| While a trend line is highlighted (dashed line), tap the m key one time. This will delete the trend line. |
P-Channels
Top of Page
- Draw a horizontal Trend Line on a significant low.
- Display the Trend Line Functions menu.
- Under the Trend Options column, select P-Channel Options. The
P-Channel menu, as shown in Figure 6, will appear.
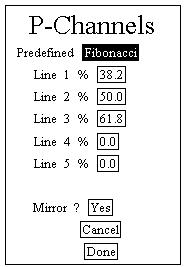
Figure 6
- Select the type of channels you desire (Fibonacci, 1/3rds, or custom) and the number of
lines (up to 5) that you want to draw.
- To edit the P-Channels values, single left click in the boxes following lines 1-5, and
type in the desired value. Then press
.
In the Mirror ? field, select Yes . The Mirror selection will draw
lines above and below the selected trend line.
Select Done. The P-Channel menu will disappear.
Display the Trend Line Functions menu.
Under the Selected Line Functions column, select P-Channels.
The menu will disappear, and the mouse pointer will change to a pencil.
Click on a significant high point of the chart. The P-Channels will be drawn and should
be similar to the ones in Figure 7. Figure 7 was set up using the menu options from Figure
6.
Figure 7
Parallel
Top of Page
Display the Trend Line Functions menu.
Double left click on DELETE ALL. All trend lines and the menu will
disappear.
Left click and HOLD on a low point on the chart. The cursor will change to a pencil.
Drag the mouse pointer to a high point, and release the left mouse button. A trend line
will be drawn, and the mouse pointer will change back to a square box.
Display the Trend Line Functions menu.
Under the Selected Line Functions column, select Parallel. The menu
will disappear, and the mouse pointer will change to a pencil.
Select another high point on the chart, and single left click on it. A line parallel to
the original trend line will appear.
Linked Parallel
Display the Trend Line Functions menu.
Double left click on DELETE ALL. All trend lines and the menu will
disappear.
Left click and HOLD on a low point on the chart. The cursor will change to a pencil.
Drag the mouse pointer to a high point, and release the left mouse button. A trend line
will be drawn, and the mouse pointer will change back to a square box.
Display the Trend Line Functions menu.
Under the Selected Line Functions column, select Linked-Paral. The
menu will disappear and the mouse pointer will change to a pencil.
Select another high point on the chart, and single left click on it. A line parallel to
the original trend line will appear.
With the right mouse button, single click on the original trend line. It will change
from a solid line to a dashed line.
Click and HOLD the right mouse button. The mouse pointer will change into a hand.
Move the mouse. Both lines will move at the same time.
>Extend & Truncate
Top of Page
Display the Trend Line Functions menu.
Double left click on DELETE ALL. All trend lines and the menu will
disappear.
Left click and HOLD on a low point on the chart. The cursor will change to a pencil.
Drag the mouse pointer to a high point, and release the left mouse button. A trend line
will be drawn, and the mouse pointer will change back to a square box.
Display the Trend Line Functions menu.
Under the Selected Line Functions column, select Extend. The
line will extend to the end of the chart in the direction in which it was drawn.
| Once a trend line has been drawn, double left click on the end of the trend
line. The first double click will Extend the Line. The second double click will Truncate
it. This is a faster way to extend or truncate. |
- Display the Trend Line Functions menu.
- Under the Selected Line Functions column, select Truncate.
The trend line will return to its original size.
Trend Options
The Trend Options column allows you to set parameters for certain trend line functions.
This section will explain some of those functions.
Disable / Enable Labels
Top of Page
This selection lets you label trend lines. To label your trend lines, follow these
steps:
- Draw a trend line on a chart.
- Display the Trend Line Functions menu.
- If the first selection in the Trend Options column is Enable Labels,
click on it.
- If the first selection in the Trend Options column is Disable Labels,
click on Done.
- Double left click on the trend line number. An edit box will appear.
- Type the desired name (a maximum of 19 characters can be used) for this trend line, and
tap the
key one time.
With the right mouse button, grab the label, and move it to the desired location.
Disable
/ Enable Snap
When Snap is enabled, trend lines will snap to a price.
Disable / Enable Status
Top of Page
This selection displays the trend line status bar (see Figure 8).
The status bar gives information on the selected trend lines start time & price and
finish time & price.
Figure 8
Gann Options & P-Channels
Please see the sections on Gann Squares and P-Channels for information on these
selections.
TD Options
Top of Page
Please see the Aspen Systems supplement to Demark Studies for
information on this selection.