15 DATA RETRIEVAL
Main Table of Contents
This chapter explains how to use the Data Retrieval feature in Aspen
Graphics. Before data retrieval will work, your server or standalone unit must be equipped
with a compatible modem.
There are two methods of retrieving data, and the Data Retrieval Feature enables you to
"refresh" or "update" your tick, bar, and daily data at any time.
Data Retrieval Setup for
Aspen Graphics 3.01
Top of Page
Data Retrieval Setup can only be performed on Aspen
network servers and Aspen standalone units. |
Before you can retrieve data from the Aspen Graphics database, you must have the
correct settings in the Data Retrieval Setup menu. To check or change these settings,
follow these steps:
- Type .drset
 . The
3.01 Data Retrieval Setup menu (see Figure 1) will appear.
. The
3.01 Data Retrieval Setup menu (see Figure 1) will appear.
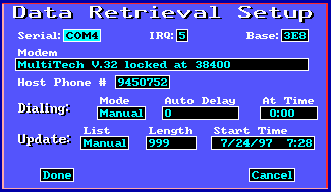
Figure 1
Under the heading of Serial, single left click on the word None. A
drop down box with Com choices will appear.
Select the correct Com port for your modem. The IRQ and BASE fields will
automatically be filled with the appropriate information.
Make sure that the IRQ and BASE fields have the correct parameters for your modem.
Under the heading of Modem, single left click on the modem field. A
Modem menu will appear.
Select the proper script for your modem.
Single left click in the Host Phone # field. An edit box will appear.
If no phone number is present, type in the phone number for Aspen’s data retrieval
servers, and tap the key
one time. Please call Aspen Graphics Technical Support for the correct number. If you must
dial 9 to get an outside line, type in a 9 followed by a period. Also, don’t forget
the number 1 if you have to dial long distance.
Single left click in the Dialing Mode field. A Mode menu will appear.
Select the dialing mode you wish to use. Choosing Auto will make the modem
automatically dial out when a request is made. The Manual selection makes
the modem wait until a .dial command is issued. The At Time selection
will dial the modem at a specific time.
Single left click in the Update List field. A List menu will appear.
Select the list mode you wish to use. When you choose Auto, the system
will automatically insert an instrument in the update list when you bring up that
instrument on a chart or quote page. When you choose Manual, you must enter
each instrument that you want updated.
Single left click in the Update Length field. An edit box will
appear.
Enter the maximum number of symbols to appear in the update list (maximum of 999
symbols), and tap the key
one time.
Single left click in the Start Time field. An edit box will appear.
Type in the starting date for data retrieval. If you want to update data back to the
beginning of 1997, then type 1/1/97 . The start date you entered will appear in that field.
Single left click on Done. The Data Retrieval Setup menu will disappear.
Data Retrieval Setup
for Aspen Graphics Version 3.02
Top of Page
Data Retrieval Setup can only be performed on Aspen
network servers and Aspen standalone units. |
Before you can retrieve data from the Aspen Graphics data base, you must have the
correct settings in the Data Retrieval Setup menu.
To check or change these settings, follow these steps:
- Type .drset . The
3.02 Data Retrieval Setup menu (see Figure 2) will appear.
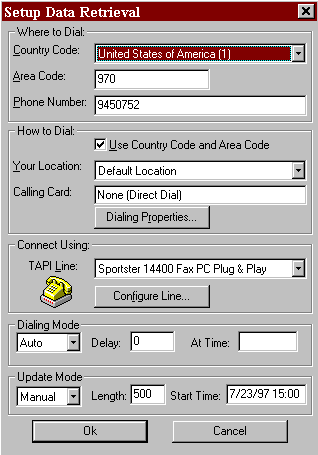
Figure 2
Double left click in the Area Code field.
Type in the number 970 and tap the key one time.
Double left click in the Phone Number field.
Type in the number 9450752 and tap the key one time.
In the How to Dial section, single left click on Dialing Properties.
The Dialing Properties menu will appear (see Figure 3).
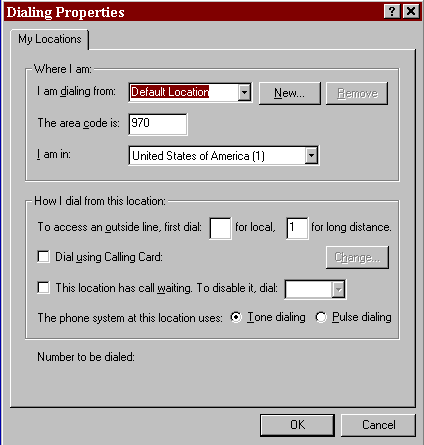
Figure 3
- Double left click in the The Area Code Is field.
- Type in your area code and tap the key one time.
- If you need to dial a number to access an outside line, single left click in the
To access an outside line, first dial field.
- Type in the access number and tap the key one time.
- Single left click in the for long distance field.
- Type the number 1 and tap the key one time.
- Single left click on OK.
- Under the Connect Using header, single left click on the down elevator
button at the end of the TAPI Line field. Your modem should appear as a
selection.
- Single left click on your modem. It will become the selected modem.
- Single left click on the down elevator button in the Dialing Mode field.
- Select the dialing mode you wish to use. Choosing Auto will make the modem
automatically dial out when a request is made. The Manual selection makes
the modem wait until a .dial command is issued. The At Time selection
will dial the modem at a specific time.
- Single left click on the down elevator button in the Update Mode field.
- Select the list mode you wish to use. When you choose Auto, the system
will automatically insert an instrument in the update list when you bring up that
instrument on a chart or quote page. When you choose Manual, you must enter
each instrument that you will want updated.
- Single left click in the Length field.
- Enter the maximum number of symbols to appear in the update list (maximum of 999
symbols), and tap the key
one time.
- Single left click in the Start Time field.
- Enter the starting date for data retrieval. If you want to update data back to the
beginning of 1997, then type 1/1/97 . The start date you entered will appear in that field.
- Single left click on OK.
Retrieving
Historical Data
Top of Page
This section will explain the differences between a refresh and an update. It will also
step you through the data retrieval process.
Refresh
The refresh command retrieves only data displayed in a chart window. This command
can only be entered on a Standalone unit or a Network Workstation. To refresh your charts,
follow these steps:
- Bring up a chart with a symbol for which you would like to retrieve data.
- Make sure that the time scale of your chart draws the entire period of time for which
you want to pull back data.
- Type .refresh . If
your dialing mode is set to auto, the system will automatically dial out and fill in the
chart.
- If your dialing mode is set to manual, type .dial . The modem will dial out and connect to the Aspen data
retrieval system.
Update
The update command retrieves data for all symbols in the update list. This command
retrieves the data from as far back as you have the start time set in
the Data Retrieval Setup menu. If the start time is set to the current time and date, the
system will only update the Master Table of symbols. To update your charts, follow these
steps (The Update command can only be issued on a standalone system or a network server):
- Type .uplist . The
Edit Update list will appear.
- Check the list to make sure that all the symbols you want to update are included.
- Single left click on Done. The update list will disappear.
- Type .drset . The
Data Retrieval Setup menu will appear.
- Single left click on Start Time. An edit box will appear.
- Type in the starting date for data retrieval. If you want to update historical data back
to the beginning of 1997, then type 1/1/97 . The start date you entered will appear in that field.
- Single left click on Done.
- If your dialing mode is set to auto, the system will dial automatically. If your
dialing mode is set to manual, type .dial . The modem will then dial out and connect to the Aspen
data retrieval system.
Data Retrieval Status
Top of Page
Type .drstat .
The Data Retrieval Status window will appear ( see Figure 4).
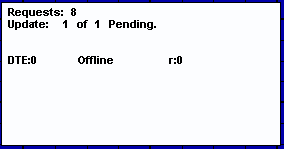
Figure 4
The Data Retrieval Status window shows the number of requests
and the call status for the data retrieval function.
The following fields are present in the data retrieval status window:
Requests
- Number of
data retrieval requests to be processed.
Status line
- Shows
what the modem is doing.
DTE
- Indicates the
type of modem that you have selected in data retrieval.
Offline
- Indicates the
status of the modem.
r
- Packets received.
x
- Packets
transmitted.
Data Retrieval Commands
Top of Page
| Command |
Function |
| .dial |
Initiates a call to the host. |
| .drcancel |
Cancels all requests for data. |
| .drmenu |
Displays the Data Retrieval menu. |
| .drset |
Displays the Data Retrieval Setup menu. |
| .drstat |
Displays the Call Status window. |
| .hangup |
Causes the modem to hang up. |
| .refresh |
Refreshes the data displayed on a chart. |
| .update |
Updates all symbols in the Edit Update List. |
Table 1