Aspen Grapics Windows
Top of Page
Aspen Graphics is equipped with several different window
types. There are windows for displaying quotes, charts, time & sales, news, and
clocks. Aspen Graphics windows perform differently than windows you may be familiar with
in Microsoft Windows® products. Generally, an Aspen Graphics window is a rectangular area you can place anywhere on the
screen and change to any size. Specifically, a window is unique in the type of information
it is designed to display.
Adding Windows
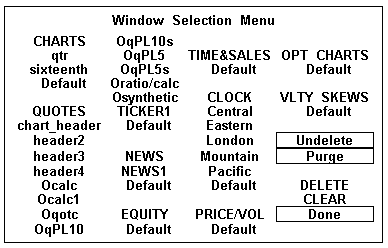
A window is added to the screen using the Window Selection Menu (see Figure 1). This menu contains the windows available for your use.
Figure 1
To add a window, follow these steps:
Window Types Top of Page
The Window Selection Menu contains several headings that correspond to the window types available to you.
Below each heading is a list of custom windows and a default selection. A default window is a template used to create a new window specific to your needs. For example, a default quote window is used to create custom quote window layouts.
In addition to the default window, you may see one or more additional window names under each heading. These are windows that have been edited and saved. The ability to save windows enables you to create a window to use on its own or as a component of a page.
The Window Selection Menu Top of Page
In addition to the window names listed in the Window Selection Menu, there are several menu selections. These functions are designed to assist you in laying out a page. They are listed in Table 1.
Selection |
Function |
| Undelete | This selection is hidden unless you have deleted a window from the menu. If you have deleted a window, the undelete selection enables you to recover it. |
| Purge | This selection is also hidden unless you have deleted a window. If you have deleted a window from the menu, the Purge selection completes the deletion. This selection is protected and must be double-clicked on to activate. |
| DELETE | Removes the active window from the screen; it does not delete the active window from memory. This selection is protected and must be double-clicked on to activate. |
| CLEAR | Clears all the windows off the screen. This selection is protected and must be double-clicked on to activate. |
| Done | Removes the Window Selection Menu from the screen. |
Table 1
Customizing Windows Top of Page
Once a window is displayed, it can be modified in a variety of ways. For example, you can move a window to a different place on the screen, or change its horizontal and vertical dimensions. The following sections describe modifying a window’s size and placement on the screen. You will find information on other changes you can make to the different window types throughout this guide.
Grid Snap Top of Page
By default, the grid snap is active. As you begin using Aspen Graphics, you should leave the grid snap feature on. This will help you keep the borders of windows within the boundaries of your screen while you are learning to re-size windows. Keeping the borders of windows within the boundaries of your screen is important because color monitors can convert color images to monochrome. You can, however, turn grid snap off. Turning grid snap off allows finer control in sizing windows.
To turn grid snap off, type .snap off
Moving Windows Top of Page
Aspen Graphics windows may be placed virtually anywhere on the screen and partially off the screen. Windows that are partially off the screen will continue to update as though they were in full view.
To move a window with the mouse, follow these steps:
Moving a Window with the Keyboard
You can move a window with the keyboard using the arrow keys. To move the active window, follow these steps:
Aspen Graphics allows you to re-size any application window. How you re-size a window depends on whether you are using Aspen Graphics for DOS or Aspen Graphics for WindowsÒ . While the schemes are similar, there are subtle differences. Make sure you read the correct sizing instructions.
If the grid is on, the window will snap to the background grid. |
Sizing a Window With the Mouse in Aspen Graphics for DOS
To re-size a window follow these steps:
Sizing a Window With the Mouse in Aspen Graphics for Windowsâ
To re-size a window, follow these steps:
Sizing a Window With the Keyboard
Re-sizing a window with the keyboard is the same in DOS or Windowsâ . To re-size a window, follow these steps:
The arrow keys move the bottom and right borders.
Re-sizing or re-shaping a window may affect the contents of the window. The effects of re-sizing are explained in the chapters on each application.
With Aspen Graphics, any windows that are created or edited can be saved. To save a window, follow these steps:
| Do not name a window exclusively a symbol or a number, or any Aspen Graphics command. If you enter a name that has already been used for a window, you will be prompted with the message: "Overwrite Existing Window?" You can either single left click on Cancel and change the name, or overwrite by double left clicking on Proceed. |
The window will be listed in the Window Selection Menu. The window’s position on the screen, its dimensions and the instruments you have entered into the window will be saved.
If you select a window to be saved, and then decide not to save the window, press the ![]() key, and the save command will be
terminated.
key, and the save command will be
terminated.
To recall the window, simply type in the name of the window, and tap the
Deleting a Window Top of Page
To delete a window from the Window Selection menu, follow these steps:
| Do not click on a window's name or press the enter key during the next step. |
| We recommend that you maintain your Aspen Graphics system
by occasionally deleting unused windows from the Window Selection Menu. |
Top of Page
There is no technical limit to the number of application windows that can be put on a screen, but there is a practical limit to how small a window can become. You can add windows to a screen using the Window Selection Menu or by typing a window’s name and tapping the
You have already read about the basic techniques for using Aspen Graphics windows. These basic techniques apply when more than one window is on the screen. As windows are added to the screen, they may be reshaped to fit the available space. The variety of possible screen arrangements is limited only by your imagination. With multiple windows on the screen, it is necessary to select the window with which you want to work. The selected window becomes the active window.
The Active Window Top of Page
Though there may be many application windows (quote, news, graphs etc.) on the screen, there is always one, and only one, active window at any time. This does not mean that the other windows will not continue to update. All windows continuously update. The instructions you give to Aspen Graphics, either through a menu or a command, normally apply only to the active window.
When you add a new window to the screen, it automatically becomes the active window. The active window is differentiated from the other windows on the screen by its highlighted border. If you cascade your windows, the active window will always be in the foreground.
Special Window Functions Top of Page
Aspen Graphics provides several customization features that can be applied to the active window. These features allow you to further customize screens to match your particular needs. Window functions are selected through the application menu. To customize the window, follow these steps:
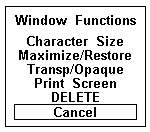
Figure 2
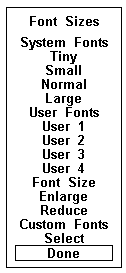
Figure 3
The Transp/Opaque selection is a toggle. When you select this toggle, the background of the active window turns transparent, and you can see through the window. If you select this toggle a second time, the background of the active window returns to opaque.
The keyboard command for this feature is .trans
Maximize/Minimize feature Top of Page
Versions 3.02 and higher include a window maximize and minimize feature. When the mouse pointer is moved to the top right hand corner of a window smaller than full screen, the maximize icon will appear.
![]()
Single left clicking on this icon will expand the window to full screen size.
When a window is in maximized mode, moving the mouse pointer to the top right hand corner of the window will display the minimize icon:
![]()
Single left clicking on this icon will return the window to its original size.