![]()
![]()
![]()
![]()
To set up a network connection using Dial-Up Networking, follow these steps.
1. Double-click the My Computer icon
2. Double-click Dial-Up Networking folder.
This displays the Dial-Up Networking window.
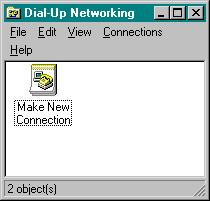
3. Double-Click the Make New Connection icon.
This launches the Make a New Connection wizard. The wizard will prompt you for the following information:
![]() Connection name: provide a name that describes your RAS Server connection.
Connection name: provide a name that describes your RAS Server connection.
![]() Modem type: the default modem is the modem installed in your RAS Client computer.
Modem type: the default modem is the modem installed in your RAS Client computer.
![]() Area Code: provide the area code of the RAS Server you will be dialing.
Area Code: provide the area code of the RAS Server you will be dialing.
![]() Telephone Number: provide the three-digit prefix and four-digit number for the RAS Server you will be dialing.
Telephone Number: provide the three-digit prefix and four-digit number for the RAS Server you will be dialing.
![]() Country Code: United States of America (1)
Country Code: United States of America (1)
4. When you have provided this information in the wizard, select finish.
This creates a new connection icon in the Dial-Up Networking window.
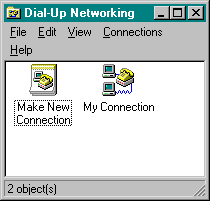
Once the new connection icon has been created, you are ready to configure the connection properties.
5. Position the mouse pointer over the new connection icon and hold down the right mouse key.
This displays a pop-up menu.
6. Choose Properties from the pop-up menu.
This displays the properties window for the new connection icon.
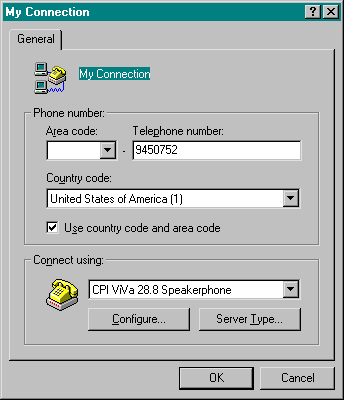
7. In the Connect using section, select the Server Type button.
This displays the Server Types dialog box.
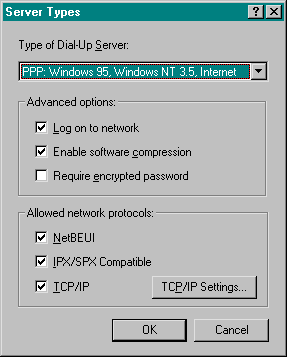
8. In the Allowed network protocols section, make sure the TCP/IP check box is checked. Then click on the TCP/IP
Settings button.
This displays the TCP/IP Settings dialog box.
9. Set the TCP/IP address acquisition technique you will use in connecting to the RAS Server.
![]() If DHCP governs address assignment on the network you’re dialing into, select the Server assigned IP address and Server
assigned name server addresses radio buttons.
If DHCP governs address assignment on the network you’re dialing into, select the Server assigned IP address and Server
assigned name server addresses radio buttons.
![]() If DHCP is not in use on the network you’re dialing into, select the Specify an IP address radio button and enter the IP address
your RAS Client will use when dialing in.
If DHCP is not in use on the network you’re dialing into, select the Specify an IP address radio button and enter the IP address
your RAS Client will use when dialing in.
10. Make sure the Use IP header compression check box is checked.
11. Make sure the Use default gateway on remote network check box is checked.
12. Click OK.
This returns you to the Server Types dialog box.
13. In the Server Types dialog box, click OK.
This returns you to the new connection dialog box.
14. In the new connection dialog box, click OK.
This returns you to the Dial-Up Networking window.
Your RAS Client is now ready for use.
![]()