![]()
![]()
![]()
![]()
To configure the TCP/IP protocol for RAS operations, follow these steps:
1. Open the Start menu.
2. Select Settings.
3. Select Control Panel.
This displays the Control Panel.

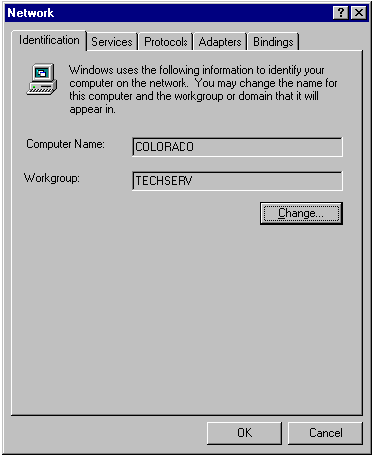
4. Double-Click on the Network icon.

This displays the Network dialog box:
5. Click on the Protocols tab.
This displays a list of the protocols installed on this system.
6. Select TCP/IP.
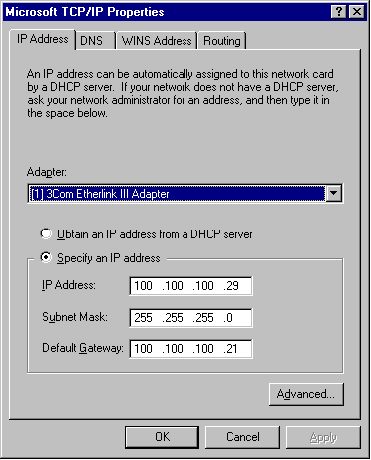
7. Click on Properties.
This displays the TCP/IP Properties dialog box:
8. Choose the appropriate TCP/IP address acquisition technique:
![]() If DHCP is not used on your network, make sure the Use static address pool radio button is selected. Then, supply the TCP/IP
address or addresses that can be used by RAS in the Begin and End fields.
If DHCP is not used on your network, make sure the Use static address pool radio button is selected. Then, supply the TCP/IP
address or addresses that can be used by RAS in the Begin and End fields.
![]() Enter the IP address of the RAS workstation in the IP Address field.
Enter the IP address of the RAS workstation in the IP Address field.
The IP Address is the TCP/IP address of the RAS workstation on the network. This unique address identifies the RAS workstation
from all other workstation and servers on the physical network.
![]() Specify the Subnet Mask of the RAS workstation in the Subnet Mask field.
Specify the Subnet Mask of the RAS workstation in the Subnet Mask field.
The Subnet Mask identifies the leg of the physical network to which you are connecting. This value is required. A TCP/IP network
uses the Subnet Mask to route IP datagrams. A network may have many Subnet Masks, or only one. Consult your network
administrator to properly identify your workstation’s Subnet Mask.
![]() Specify the Default Gateway of the RAS workstation in the Default Gateway field.
Specify the Default Gateway of the RAS workstation in the Default Gateway field.
The Default Gateway is another convention used to route IP datagrams. If a host computer cannot determine where to route a
datagram, that is, it doesn’t know” the IP address to which a datagram is supposed to go, it uses the Default Gateway value to
route the datagram. This value is required. Consult your network administrator to properly identify your workstation’s Subnet
Mask.
![]() If DHCP is used on your network, make sure the Use DHCP to assign remote TCP/IP client addresses radio button is
selected.
If DHCP is used on your network, make sure the Use DHCP to assign remote TCP/IP client addresses radio button is
selected.
9. Click on the Routing tab.
This displays the TCP/IP Properties routing information.
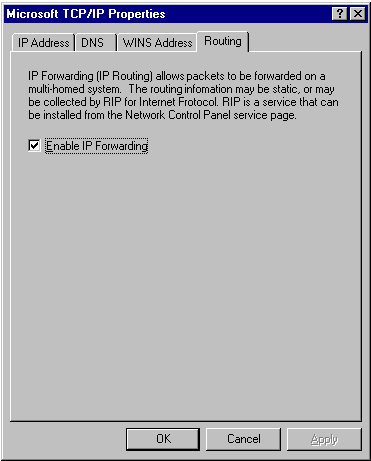
10. Make sure the Enable IP forwarding check box is selected.
11. Close all dialog boxes by clicking on OK.
When you close the Networking dialog box, NT 4.0 will inform you that you must re-start the workstation before your changes will
take effect. Select Shut down and re-start now so your system will re-start.
When the workstation finishes re-starting, it is ready to operate as a RAS server.